
Step-by-Step Guide
Loading your Straw

Materials Included in Pack:
Sterile chuck pad
Saline rinse
Sterile gauze
Sterile syringe
Straw

Step 1: Prepare Your Workspace

Wash your hands thoroughly before handling any materials.
Open the pack on a clean, flat surface.
Use the sterile chuck pad to lay out all supplies.


Open the saline rinse by twisting off the top.
Insert the tip of the saline rinse into the female end (wider opening) of the straw.
Gently squeeze the saline through the straw, allowing it to flush out onto the sterile gauze pad.
Use the saline-soaked gauze to wipe the outside of the straw, ensuring it is clean.
Step 2: Prepare the Straw
Step 3: Prepare the Syringe
Remove the sterile syringe from its paper sleeve.
Pull the plunger to fill the syringe with air (this helps with smooth operation).
Test the syringe movement by pushing and pulling the plunger a few times to get comfortable.
Step 4: Attach the Syringe to the Straw

Firmly connect the syringe to the female end of the straw.
Push the air through the straw to ensure it’s clear.
Step 5: Load the Sample
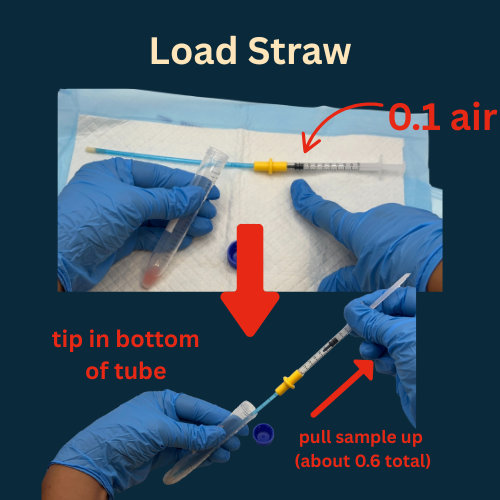
Pull the syringe plunger back to the 0.1 mark (the first large line).
Carefully open your sample tube and place the straw tip at the bottom.
Slowly pull the plunger up to draw the entire sample into the straw (should reach around the 0.6 mark—exact amount may vary).
Important: Do not detach the syringe, or the sample will be lost.
Step 6: Add an Air Buffer

Pull the plunger back slightly to draw 0.1 of air (now at the 0.7 mark).
Important: Do not detach the syringe, or the sample will be lost.
Step 7: Deposit the Sample
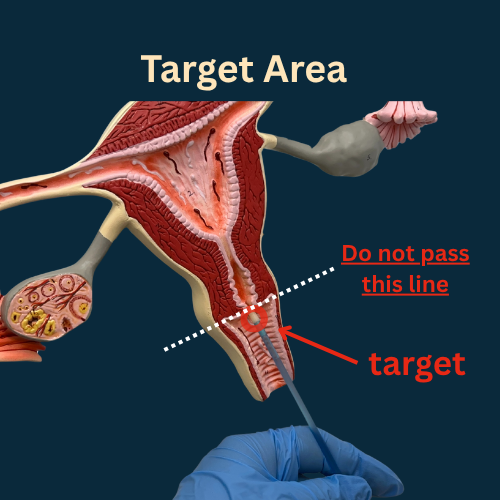
Once in position, slowly push the plunger to deposit the sample.
Important: Do not detach the syringe, or the sample will be lost.
Rest for 30 minutes before disposing of materials.
Wash your hands thoroughly after completion.